![[Mom Prepared]](https://momwithaprep.com/wp-content/uploads/2024/12/cropped-momlogo-244x56.png)

Do you need an alternative cooking source that is inexpensive, quick to put up, relatively mobile, and easy to use that is more than a small rocket stove? Today, one of my friends, Bunny Wickham, is guest posting on the blog, sharing her story of how she and her husband built a concrete brick rocket stove in one afternoon.
They now have an alternative, non-permanent means of cooking at their home in the case of an emergency. This is even portable in case they need to relocate.
DIY ROCKET STOVE EXPERIMENT
How did you get started?
After watching a few tutorials on YouTube, my husband and I decided to try building our own rocket stove.
Our total cost for this project was $14.59.
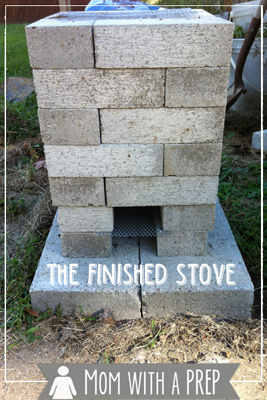
We purchased 27 concrete bricks and had everything thing else on hand that we needed. We were really, really pleased with the results. The fact that the tender sits up off the bottom allows for air flow to be drawn in and up the combustion chamber.
I was surprised at how little wood that was required to produce a really hot fire. I just gathered a couple of handfuls of sticks and twigs from the yard and we were cooking!
The design of a rocket stove lends itself to super efficient cooking…gotta love that! Being able to cook and boil water in a grid down situation is critical. Sure, we still have the grill, the fireplace (inside), the firepit (outside) and the solar oven but this just gives us one more option.
How does it work?
The pot/pan has to sit up off the bricks to allow for the air to pull up the chamber. We used some scrap metal that I put on either side of the opening to rest the pot on. I’m going to check at the salvage yard (where people dump old stoves) and see if I can find some burner grates.
The screen at the bottom is where you put the wood, its up off of the brick and allows for airflow to draft in and up the combustion chamber, which you really need for this design. The one on top was just used to cut down on potential sparks that might have come out but honestly its not needed.
This is the video that got me inspired!
What supplies did you need?
- 27 concrete bricks
- Grate
- Metal Screening
What about the suggested dangers of concrete bricks in rocket stoves?
These are just regular concrete bricks. We researched it a bit a determined that it would be suitable for the occasional use. I felt the side of the bricks as I used it and the outside part of the brick was barely warm after I’d cooked on it so I think the heat transfer will be ok.
note: Your mileage may vary. While Bunny suggested this is good for occasional use, using non-fire bricks may be a danger for exploding if you run them often in extreme heat.
A bit about Bunny:
- I am mom of 4, married 25 years.
- I have a back ground in Emergency Management and a passion for preparedness.
- I am a founding member of our county’s CERT program (Community Emergency Response Team)
- I embrace the homesteading/back to basics movement.
- I am an avid baker, I LOVE the smell of freshly baked breads filling my kitchen!
- …I have yet to try bread on the rocket stove though. I have seen an oven component to the rocket stove…maybe that should be my next project!?!
From Jane: This is definitely a project you can do with your family in less than two hours. We have a small portable rocket stove that is great for going on the road, but this is one we want to have in our skills pantry to be able to put together in a heartbeat in a localized emergency or just to have fun with camping in the backyard.
It would even be something we’d consider taking with us if we were camping for a weekend. It would just line the bottom of our trunk since it is not a permanent structure, and we could build it wherever we needed it. Be sure to watch the video below to see one in action!


")


")


